Tax Pro Plus
2999 Overland Ave.
Suite 204
Los Angeles, CA 90064
Map It!
Ph: (310) 827-4829
Fax: (310) 842-7160
info@taxproplus-la.com
Declare Your Independence From Security Worries: Use QuickBooks' Protection Tools
If there’s one application that you don’t want compromised by a security breach, it’s the one that contains all of your financial information. Recognizing that, Intuit has built a number of security features into QuickBooks that are designed safeguard your debits and credits.
Tip: QuickBooks integrates with Microsoft Internet Explorer for some of its work. We’ll discuss some of its safety tools, but you may want to check with your accounting professional to see if your larger system is well-protected against malware, viruses, etc.
Set Up Preferences
Fortunately, QuickBooks is open for integration with many outside applications that complement QuickBooks’ native capabilities and extend its usefulness. But you should make sure that your system is set up to accommodate the features that you want to use.
To do this, click Edit | Preferences | Integrated Applications. Then click on the tab labeled Company Preferences. Here you’ll be able to indicate that:
- no applications should be allowed access, and
- you should be notified if an application’s certificate has expired.

Figure 1: QuickBooks lets you specify who gets in, and what they can do.
Check the top box if this outside application should be allowed in, and make decisions about the other options here. If you have any questions, give us a call and we’ll make sure your choices suit your business.
Broaden Your Horizons
QuickBooks relies on the Internet for many of its functions, which makes the program much more versatile. You can use this Web connection to update your copy of QuickBooks, receive payroll updates, download financial institution transactions, and access myriad business resources.
If your copy of QuickBooks is not yet integrated with Internet Explorer, click on the Help menu, then Internet Connection Setup. Work through the wizard to specify the correct connection to use, as shown in Figure 2.
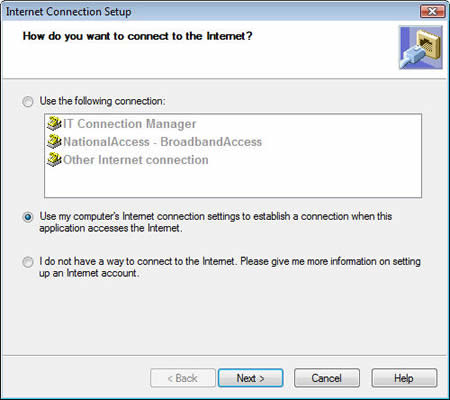
Figure 2: To make sure your QuickBooks/Internet Explorer integration is working securely, specify the correct Internet connection.
Click on Edit | Preferences again, then click Service Connection. Under the My Preferences tab, you’ll be asked to decide whether:
- data downloaded from your financial institution—or information previously downloaded—should be processed immediately or saved to a file, or
- Internet Explorer should remain open after you’ve completed a Web-based task (only applicable if QuickBooks has opened IE).
Click the Company Preferences tab. Here, you’ll tell QuickBooks whether it should automatically connect to Web services (other than Payroll or Online Banking; these have their own passwords) or if a password will be required. You’ll also specify whether service updates from Intuit should be automatically downloaded, as shown in Figure 3.

Figure 3: In the window, you can specify your preferences for password requirements and background downloading of service updates.
To ensure that you’ll be able to see all QuickBooks-related content on the Web, open Internet Explorer. Click the Tools menu, then Internet Options. Click the Security tab, and make sure the level is set to Medium, as suggested by Intuit.
Internal Security
Of course, QuickBooks offers internal tools to prevent unauthorized employees from reaching sensitive information. To access these, click Company | Set Up Users and Passwords | Set Up Users. You must be the Administrator to enter this area.
The window that opens gives you several options. You can add, edit, delete, or view a user. Click the Add User button, and assign a user name and password on the next screen. Click Next, and in the next window, choose whether to give the individual access to all areas of QuickBooks, or just a subset (the External Accountant option lets your accounting professional enter most areas of the program).
Choose Selected areas of QuickBooks and click Next in the window shown in Figure 4.

Figure 4: QuickBooks lets you specify which areas and functions individual users can access.
On each page in this wizard, you can assign no, full, or selective access to tasks for each employee. Other functional areas include Payroll and Employees, Time Tracking, and Sensitive Accounting Activities. When you’re done, click Finish.
Keep It Safe
Remember, too, that Intuit employs high-level encryption that secures your sensitive financial information. And it of course recommends that you back up frequently to further protect your data. If this all seems like too much poking around in QuickBooks, give us a call and we’ll help you make the right choices.
The Tax Pro Plus newsletter is available via e-mail on a free subscription basis. You can subscribe or unsubscribe at any time. For more information about - Tax Pro Plus, go to http://www.taxproplus-la.com. This message was sent using ClientWhys Persyst. View our permission marketing policy.
Disclaimer: The tax advice included in this newsletter is an overview of some complex tax rules and is not intended as a thorough in-depth analysis of the tax issues discussed. Do not act on the information included in this newsletter without first determining how these issues apply to your particular set of circumstances and if there are any special tax laws or regulations that might apply to your situation.
|
|  |